How Can You Tell If Your RV Battery Is Failing? (Signs You Have to Know)
Last summer, I learned this the hard way. Everything seemed fine at first, but then the RV lights started getting weak, the fridge struggled to stay steady, and the engine took longer to start. I ignored it because the battery was still working, but that was the mistake.
How can you tell if your RV battery is failing before it completely dies on the road? The clearest signs are fast charge loss, low voltage, dim lights, weak appliance performance, slow engine starting, corrosion on the terminals, swelling, leaking, or power that cuts in and out.
The good news is you can catch most RV battery problems before they ruin your trip. A quick inspection and a simple voltage test can tell you a lot about your battery’s condition before it leaves you stuck somewhere.
In this guide, we’ll break down the warning signs, what they mean, and what you should check first so you can protect your RV, your trip, and your peace of mind.
What Is An RV Battery and Why Does It Matters?
An RV battery powers the living area of your camper. It runs the lights, water pump, furnace fan, slide-outs, and other important 12-volt systems inside the RV.
Many people confuse it with the engine battery, but both serve different purposes. The starting battery only helps start the vehicle engine. The house battery keeps the living space functional while camping.
This battery acts like the main power source for daily comfort. Water flows through the pipes because of it. Warm air circulates through the furnace fan using stored battery power. Even powered steps and slide-outs depend on it.
Most RVs use deep-cycle batteries because they are designed for long, steady energy use. Unlike regular starting batteries, they can discharge and recharge repeatedly without damage.
For people who enjoy off-grid camping, keeping the RV battery healthy is essential for a smooth and comfortable trip.
How Can You Tell If Your RV Battery Is Failing: 7 Warning Signs
Catching battery trouble early can save you money and prevent major headaches on the road. Here are the most common signs of failing RV batteries to watch for.
1. It Won’t Hold a Charge
This is usually the first sign something is wrong. You go to bed with the battery showing 100%, then wake up to a low-battery alarm. Healthy RV batteries lose power slowly. A failing battery drains much faster because it can no longer store energy properly.
Sometimes it may still show “full” right after charging, but the power drops fast as soon as you turn something on. This is called a surface charge. It looks full but doesn’t last. If your battery can’t make it through one quiet night running a few lights and the water pump, it’s likely wearing out.
2. Lights Dim and Appliances Slow Down
Your RV often shows RV battery problems before the monitor does. Watch for signs like:
LED lights flickering or dimming
Water pump sounding weak or sputtering
Furnace blower pushing less air
Slide-outs moving slowly or stopping
Awning motors dragging
These all point to low voltage. The battery can’t provide enough steady power to keep things running normally.
3. It Takes Much Longer to Recharge
A healthy battery should recharge within a few hours when plugged into shore power. While a failing battery builds up internal resistance. This makes it harder to accept a charge. Meaning, charging takes much longer, and sometimes it never reaches 100%.
You might leave it plugged in all weekend and still see it stuck at 80%. Another clue is a loud converter fan running for long periods because it’s working overtime to charge damaged cells.
4. You Smell Rotten Eggs
This is a serious warning sign. If you smell sulfur or rotten eggs near your battery, disconnect power right away.
This smell usually means the battery acid is overheating and boiling inside the case. After some time, hydrogen sulfide gas will form. It is toxic and highly flammable.
Open the battery compartment to vent it safely, and do not ignore the smell.
5. The Battery Case Looks Swollen or Cracked
A healthy battery case should be flat and solid. If you see:
Bulging sides
Warping
Cracks
Leaking fluid
The battery is likely damaged beyond repair. Heat can cause swelling, and freezing temperatures can crack the case.
A swollen battery can rupture and leak acid, so do not try to charge it. Replace it immediately.
6. Heavy Corrosion on the Terminals
A little discoloration is normal. Thick crusty buildup is not. Look for white, blue, or green corrosion around the battery terminals.
This usually means acid is leaking from damaged seals. Corrosion blocks power flow and can cause poor performance. You can clean it off, but if it keeps coming back, the battery is likely failing internally.
7. Low Resting Voltage
The best way to check battery health is with a voltmeter. Let the battery sit unplugged for at least one hour with everything turned off, then test it. Here’s a voltage guide:
12.6V or higher: Fully charged and healthy
12.2V to 12.4V: About 50% to 75% charged
12.0V: Low, recharge soon
11.9V or lower: Dead or failing
If your battery won’t rise above 12.0V even after charging for 24 hours, it’s time to replace it.
Pro-Tip: RV batteries rarely fail without warning. If you notice one or more of these signs, test it right away. Replacing a weak battery early is far better than losing power in the middle of a trip.
Troubleshooting RV Battery Issues: 3 Easy Ways
Guesswork always gets expensive at the mechanic shop. When troubleshooting RV battery issues, let us use hard data for a proper battery diagnosis to confirm those suspicious symptoms using simple, cheap DIY methods.
1. The Multimeter Voltage Test
A basic digital multimeter is the best cheap tool you will ever buy for your camper. Grab a standard multimeter from the hardware store and set the center dial to 20 Volts DC. This setting safely reads automotive-style electrical currents.
Disconnect your camper cord completely from shore power.
Turn off the roof solar controller and shut down the gas generator.
Turn on a couple of overhead lights for five minutes. This removes any false "surface charge."
Shut those overhead lights back off.
Touch the red metal probe firmly to the positive post.
Touch the black metal probe firmly to the negative post.
Read the digital screen carefully.
Look closely at the number displayed. As we covered just above, anything sitting stubbornly below 12.0V after a solid charging session indicates a completely failed unit.
2. The At-Home Load Test
Resting voltage shows storage capacity, but a load test proves actual muscular strength.
Think of this test like a medical stress test for a human heart. We want to see exactly how the electrical system reacts under intense, sudden pressure. Keep your multimeter probes connected tightly to the outside terminals. Have a camping partner go inside the rig. Tell them to turn on all the interior lights, the water pump, and the furnace blower at the same exact time.
Watch the bright numbers on your digital screen carefully. A temporary, small dip is totally normal. It might drop smoothly to 12.2V while the heavy motors initially kick on. But if the number plunges rapidly down to 10 volts or lower and stays there, you have a massive problem. The unit has absolutely no reserve capacity left. It fails instantly under pressure.
3. Hydrometer Testing (For Flooded Batteries Only)
Older, unsealed models require a much deeper look directly inside the fluid. Flooded lead-acid batteries rely on a precise chemical mixture of distilled water and sulfuric acid.
A glass hydrometer precisely measures the specific gravity, or density, of that liquid mixture. Always put on safety goggles and thick rubber gloves before starting this process. Acid burns are severe.
Pry off the plastic cell caps carefully using a flathead screwdriver.
Squeeze the rubber bulb tightly on the top of the hydrometer.
Dip the glass tube into the first cell hole.
Release the rubber bulb slowly to suck up the acidic fluid.
Check where the floating dial lands inside the glass tube. (1.265 means fully charged. 1.120 means dead).
Repeat this entire process for all six individual cells.
Compare the written numbers across the board. If one single cell reads significantly lower than the rest, you have a "dead cell." The entire unit must be replaced immediately.
Why Do RV Batteries Fail Prematurely?
Finding the root cause of the damage prevents you from accidentally destroying your shiny new replacement next month. Understanding why batteries fail helps you avoid damaging a replacement.
Auto Draining (Parasitic Draws)
Even when your RV is off, small devices can still slowly drain the battery. These include safety detectors, radio memory, antenna boosters, and appliance control boards.
Over time, these small loads can fully discharge the battery. If a lead-acid battery stays discharged too long, it develops internal damage that cannot be reversed.
Undercharging or Overcharging
Undercharging allows sulfate buildup on the plates, which reduces capacity over time. Overcharging, often from older converters, overheats the battery and causes water loss inside the cells. Both conditions shorten battery life significantly.
Extreme Weather
Cold weather can freeze a discharged battery and crack the case. Hot weather speeds up internal wear and reduces overall lifespan, especially during long-term storage in direct sunlight.
Saving a Failing RV Battery: Worth It Or Not
Everyone wants a clever trick to avoid spending hundreds of dollars, but in reality, only some fixes actually work. Some battery issues are minor and fixable, while others mean the damage is permanent. Sometimes a battery only needs basic maintenance to improve performance, while other times the internal damage is already too severe to recover.
Worth Trying First
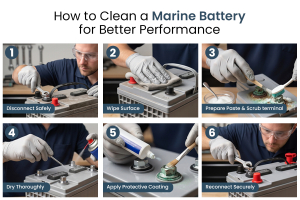
Start with simple maintenance steps before assuming the battery is finished, since small issues often come down to corrosion, low fluid, or poor connections.
Scrub corrosion from the lead posts using a wire brush and a baking soda paste to restore a solid connection.
Top off low cells with distilled water if you have a flooded battery (never use tap water).
Run a smart charger’s “desulfation” or “repair” mode for about 24 hours to help break down light sulfation.
Tighten any loose or unstable copper cable connections with a wrench to ensure proper power flow.
The Point of No Return
At a certain stage, no amount of maintenance will bring the battery back, and continuing to troubleshoot only wastes time.
The battery case is bulging, cracked, or leaking fluid.
You smell strong sulfur or rotten eggs while charging.
The resting voltage stays below 10V even after a full charge cycle.
A hydrometer test shows a completely dead cell.
Choosing The Right RV Battery For Extended Battery Life
Most RV owners think the choice comes down to price. You pick a battery, install it, and expect it to last. Then a few seasons later, you are replacing it again.
That’s usually when the question comes up: how do you choose an RV battery for real long-term use, not just short-term savings?
The answer starts with battery chemistry. Flooded lead-acid batteries are the cheapest upfront, but they need regular maintenance and careful charging. You cannot safely use their full capacity, or they wear out faster than expected. AGM batteries improve things by being sealed and maintenance-free, which removes watering and reduces hassle. Still, even robust sealed RV battery options share similar limits in weight, usable capacity, and overall cycle life.
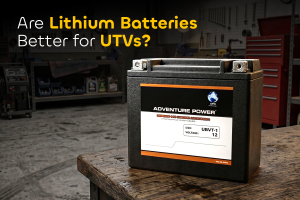
Lithium iron phosphate (LiFePO4) batteries are built for extended life. You can use more of their capacity without damaging them, they charge faster, and they hold voltage more steadily during use. Over time, they tend to outlast traditional options by a wide margin, which often balances out the higher initial cost.
The final piece is sizing and charging. Even the best battery will underperform if it is too small for your usage or paired with an incompatible charger. A well-matched system always lasts longer than a premium battery used the wrong way.
Preventive Maintenance Practices For RV Battery
Protect your expensive new investment safely with a few simple, routine habits. Good maintenance keeps your electrical core humming happily for many years.
Install a cheap mechanical battery disconnect switch to stop all phantom draws entirely during winter storage.
Buy a quality smart trickle charger to maintain resting voltage perfectly while parked at home.
Check the internal water levels in flooded types every 30 days during the busy camping season.
Keep the metal terminal posts coated lightly in dielectric grease to permanently prevent acidic crust buildup.
Never let traditional lead-acid models drop below 50% capacity if you can possibly avoid it.
Frequently Asked Questions (FAQs)
Still dealing with confusing power issues? Here are quick answers to the most common RV electrical problems.
How long should an RV battery normally last?
A standard lead-acid RV battery lasts about three to five years with proper care. Lithium (LiFePO4) batteries can last around eight to ten years or more. Lifespan depends on charging habits, depth of discharge, and maintenance.
Can a completely dead RV battery be recharged?
A lead-acid battery at zero volts is usually permanently damaged. It may show some voltage after charging, but it will not recover its full capacity. In most cases, it should be replaced.
Why does my RV battery die so quickly when parked?
The battery is usually being drained by parasitic loads like detectors, radio memory, and control boards. These small constant draws can fully discharge a battery over time unless it is disconnected or maintained.
Is it safe to leave my RV plugged in all the time?
It is safe only with a modern smart converter. Older systems can overcharge the battery, causing heat, fluid loss, and reduced lifespan.
Will a solar panel prevent my battery from dying?
Solar panels help offset small power drains and slow battery loss during storage. However, they cannot fix a battery that is already damaged.
Can I mix an old battery with a brand new one?
No, mixing old and new batteries is not recommended. The older battery will reduce the performance and lifespan of the new one.
Know Exactly Why Your RV Battery Fails
Camping only feels relaxing when your RV power system works properly. Your lights, fridge, and heater all depend on a steady battery.
Problems usually start small. Weak charging, corroded terminals, or unusual smells near the battery are early warning signs. Many RV owners then wonder how to tell when a battery is failing before it ruins a trip.
A simple digital multimeter can help you check the battery’s condition. Measuring voltage before travel gives you a clear answer instead of guessing based on performance.
A healthy battery keeps everything running smoothly. When it starts to fail, small issues can quickly turn into total power loss if they are ignored.