How to Clean a Marine Battery for Better Performance: Safe & Effective Solution

A marine battery sits quietly in your boat, but it controls everything from ignition to navigation power. When it starts underperforming, the whole trip can feel uncertain. A weak start or sudden click is often the first warning sign.
That’s when many boat owners look up how to clean a marine battery for better performance. Hoping to fix what seems like a failing unit.
In reality, the problem is often corrosion and dirt building up on the terminals, blocking proper current flow. Begin by disconnecting the cables, always removing the negative terminal first. Clean the terminals with a baking soda and water solution to neutralize buildup.
Use a wire brush to scrub until the metal is clear, then rinse with distilled water and dry completely. Finish with a protective spray. This simple maintenance improves reliability and extends battery life.
Why Marine Battery Cleanliness Directly Impacts Vessel Performance
A dirty battery is a weak battery. You might think a little dust or crust is fine. It is not. This buildup acts like a tiny leak in a bucket. It slowly drains your power. This is why keeping the case clean is a vital part of your routine. Even a reliable marine battery source can struggle if the metal is covered in dirt.
But here is the real problem. Dirt on top of the battery can carry a current. This creates a bridge between the positive and negative posts. This bridge lets electricity leak out even when the boat is off. Over time, this ruins the battery. A clean battery keeps the power where it belongs. Here are some symptoms of a poor marine battery health:
The engine cranks slowly in the morning.
Your fishfinder shuts off when you start the engine.
The battery case feels hot to the touch.
You see blue or white crust on the metal.
The lights on your dashboard look dim.
Essential Tools and Materials for Marine Battery Maintenance
You do not need a shop full of tools to do this right. Most of what you need is likely in your kitchen. Using the right supplies prevents you from damaging the soft lead posts.
And for those who want to do it like a pro, a few special items make the job faster. Below is a list of everything you need for the best cleaning methods.
Tool or Material | Purpose | DIY Option | Pro Option |
Neutralizer | Stops the acid | Baking soda and water | Professional foam spray |
Scrubber | Removes the crust | Old toothbrush | Stainless steel battery brush |
Rinse Agent | Cleans off the grit | Tap water | Distilled water |
Protector | Stops future rust | Petroleum jelly | Anti-corrosion spray |
Wrench | Loosens the parts | Pliers | 10mm or 1/2 inch socket |
1. Safety Gear: Protecting Yourself from Battery Acid
Batteries are filled with acid. This liquid can burn your skin and ruin your clothes. Always wear safety glasses when you open the battery box. One small splash can cause a lot of pain. Use nitrile gloves to keep the acid and lead off your hands. It is better to be safe now than sorry later.
2. Choosing the Right Neutralizing Agent
Baking soda is a miracle for boaters. When it touches acid, it bubbles and fizzles. This reaction makes the acid safe. If you use a store-bought foam, it often changes color to show you where the acid is. Both ways work well. But baking soda is cheap and always works.
Pre-Cleaning Inspection: Identifying Damage vs. Dirt
Before you start scrubbing, you must look for damage. Cleaning a broken battery is a waste of time. It can also be dangerous if the case is cracked.
Start by looking at the shape of the battery. It should have straight, flat sides. If the sides are bulging or swollen, the battery has failed. At this point, no amount of cleaning will fix it. You need a new one.
How to Spot Case Bulging and Leaks
Look for wet spots around the seams. If you see liquid that is not water, it is probably acid. Acid feels slippery or slimy on your gloves. If you find a crack, stop everything. A leaking battery can damage your boat hull or your trailer. It is a fire risk that you should never ignore.
Identifying Terminal Corrosion (Blue/White Powder)
That colorful crust on your battery is called corrosion. It is the number one enemy of boat power. White powder is usually lead sulfate. Blue or green crust happens when copper wires react with the acid. This crust is like a wall. It blocks the flow of electricity. If your terminals are covered in this, your engine has to work twice as hard to start.
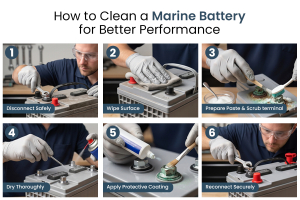
How to Clean a Marine Battery for Better Performance: Step-by-Step Guide
Now it is time to get to work. Follow these steps in the exact order listed. Doing things out of order can cause a spark. A spark near a battery can cause an explosion. Follow the rules. Stay safe. Get the job done right.
Step 1: Disconnecting the Terminals (The Order Matters)
You must remove the Negative (Black/-) cable first. This is a big safety rule. If your wrench touches the boat frame while you loosen the negative side, nothing happens. But if you start with the positive side and hit metal, you will get a massive spark. This can melt your wrench or hurt your hand.
Pro-Tip: Wrap the end of the cable in a dry rag so it does not touch the battery while you work.
Step 2: Applying the Neutralizing Solution
Mix two spoons of baking soda with a cup of water. Pour it slowly over the metal parts. You will see it fizz. This is the sound of the acid becoming harmless. Wait for the fizzing to stop. If you see a lot of crust, you may need to do this twice.
Step 3: Scouring Terminals and Connectors
Take your brush and scrub the metal. You want to see shiny silver lead. Do not forget to clean the inside of the cable clamps. The electricity needs a clear path to move. Even a thin layer of dirt can cause a bad connection. Scrub until everything looks brand new.
Step 4: Rinsing and Drying
Rinse the battery with a little distilled water. Do not use a high-pressure hose. You do not want to force water under the vent caps. Use a clean cloth to dry the whole battery. Any water left on top can help dirt stick to the case later.
Pro-Tip: Use a can of compressed air to dry the tiny spots around the bolts.
Step 5: Applying Anti-Corrosive Protection
Once the metal is dry, apply your protector. This creates a waxy shield. It keeps the air and salt away from the metal. This is a huge part of improving battery performance in the long run. If you do not have spray, use a thin layer of petroleum jelly.
Step 6: Reconnecting the Battery
Now you go in reverse. Connect the Positive (Red/+) cable first. Then connect the Negative (Black/-) cable. Make sure the nuts are tight. They should not move if you shake them with your hand. But do not use too much force. You do not want to snap the bolts.
Cleaning Specific Marine Battery Types With Care
Different batteries need different care. You would not wash a silk shirt the same way you wash jeans. Your battery is the same. Knowing the type of battery you have is key to your cleaning methods.
Lead-acid batteries are heavy and old school. Lithium batteries are light and high-tech. Treat each one with the respect it deserves.
Flooded Lead-Acid (FLA) Batteries: Managing Vent Caps
These are the most common batteries on boats. They have caps on top that come off. You must be very careful with these. Make sure the caps are tight before you use baking soda. If baking soda gets inside the battery, it will kill it. The acid inside must stay pure to hold a charge.
AGM and Gel Batteries: Sealed Case Maintenance
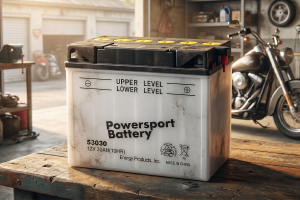
AGM batteries are sealed tight. They do not have caps. This makes them much easier to clean. Keeping a heavy-duty 12V battery clear of debris will guarantee it lasts for years. Focus your work on the terminals. Since these batteries are often in tight spots, check for any wear on the cables from vibration.
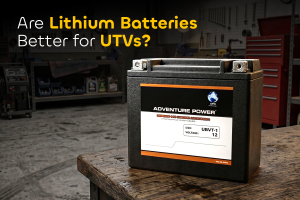
Lithium (LiFePO4) Marine Batteries: Unique Requirements
Lithium batteries are the kings of the lake today. They cost a lot of money. You must keep them clean to protect your investment. They do not leak acid like the old types. Most of the dirt will be salt or dust. Use a damp cloth and stay away from harsh chemicals. If your battery has a computer port, make sure it is dry and clear.
Enhancing Performance Through Post-Clean Care
Once the battery is clean, you are halfway there. Now you need to check the health of the inside. Think of cleaning as a wash, and this next part as a tune-up.
But here is a secret. Most people skip this part. If you do these extra steps, your battery will last twice as long.
Checking Electrolyte Levels (For Flooded Batteries)
Open the caps on your flooded battery. Look inside with a flashlight. You should see liquid covering the lead plates. If the plates are dry, the battery is dying. Add distilled water until the plates are covered. Do not use tap water. Tap water has minerals that will ruin the battery in a few months.
Using a Hydrometer to Verify Cell Health
A hydrometer is a tool that tests the liquid inside. It tells you if the battery is truly healthy. If one cell is weak and the others are strong, the battery is about to fail. This tool helps you find problems before you get stuck on the water.
Tightening Connections: Torque Specifications
Vibration from waves can loosen your battery nuts. A loose nut creates heat. Heat can melt the plastic case or start a fire. Use a wrench to keep them snug. If your battery has wing nuts, throw them away. Replace them with hex nuts. Hex nuts stay tight much longer and provide a better connection.
Common Mistakes to Avoid When Cleaning Marine Batteries
We have seen it all. People try to help their batteries but end up hurting them. Avoid these mistakes to keep your boat safe.
Avoid using Coke: People say soda cleans batteries. It does. But the sugar leaves a sticky mess. That mess attracts bugs and dirt.
Never clean while connected: You might feel it is faster. It is just more dangerous. Always pull the cables off.
Do not use too much grease: A huge glob of grease can block the flow of power. Use a thin coat only.
Never use a wire brush on the plastic: Scrubbing the plastic case can create static. Static can lead to a spark and an explosion.
Professional Maintenance & Cleaning Schedule: Monthly vs. Seasonal
Consistency is better than one big job. A quick check once a month keeps the big problems away. Use this plan to stay on top of your marine battery maintenance.
Frequency | Task | Benefit |
Monthly | Look for crust on the posts | Stops the spread of rust |
Monthly | Wipe the top of the case | Stops power leaks |
Every 3 Months | Check the water levels | Keeps the lead plates healthy |
Every Season | Deep clean and protect | Prepares the battery for storage |
Every Season | Test the battery load | Makes sure the boat will start |
Frequently Asked Questions
Most boaters have questions before opening their battery boxes for the first time. Here are the most common ones so you can head back out on the water with confidence:
Can I use Coca-Cola to clean marine battery terminals?
You should avoid using soda for this task. It contains phosphoric acid which helps remove rust. However, the high sugar content leaves a sticky mess on your battery. This residue attracts dirt and can cause more electrical leaks over time.
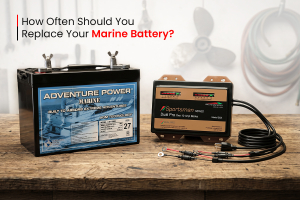
How often should I clean my boat battery?
Inspect your battery once a month. If you boat in saltwater, salt spray builds up very quickly. You should perform a deep clean at the start and end of every season. Regular checks prevent small amounts of dirt from becoming big problems.
Will cleaning my battery improve my trolling motor speed?
Yes. Corrosion on your terminals acts like a physical barrier. It slows down the flow of electricity to your motor. When you remove that crust, the motor gets the full voltage it needs. You will likely see a boost in thrust.
When is a marine battery too dirty to save?
Cleaning only fixes surface problems. If you see cracks or liquid leaking from the case, the battery is dead. If the terminals are so thin that they might snap, it is time for a new one. Safety always comes before savings.
What is the best way to protect terminals after cleaning?
Use a dedicated marine terminal protector spray. It creates a waxy shield that blocks air and salt. If you do not have spray, a very thin layer of petroleum jelly works. This step keeps your hard work from washing away too soon.
Can I use a wire brush on the plastic case?
Never scrub the plastic case with a metal brush. Doing this can create static electricity. A small spark near battery vents could lead to an explosion. Use a soft rag for the case and save the metal brush for the posts.
Maximize Your Marine Investment Today
A boat should feel simple and freeing. But when the battery weakens, that experience quickly turns into stress.
Marine batteries usually don’t fail all at once. They slowly lose performance from corrosion, dirt, and loose or neglected connections. The white or green buildup on terminals isn’t just dirt. It blocks power flow and can make starting unreliable.
Simple maintenance goes a long way. Learning how to clean a marine battery for better performance helps you keep connections clear and power flowing. Wiping terminals, safely removing corrosion, and tightening connections can improve reliability.
Do it regularly instead of waiting for problems. A clean, well-maintained battery means stronger starts, steadier electronics, and fewer surprises on the water.