How to Use a Schauer Battery Charger the Right Way
Schauer battery chargers are trusted for several reasons. Lasting performance, dynamic designs, and robust build are the first to highlight. The company has been making top-grade car chargers for over a century. But it shouldn’t keep you from learning how to use a Schauer Battery charger so it runs for a little longer.
It’s not a secret that the better you know your equipment, the more confidently you can use it. This article is in-depth and covers everything you need to know about Schauer Battery Chargers, including variations, and troubleshooting. You will also learn the best practices for usage and maintenance.
Let’s start with the first blazing question.
What’s So Special about Schauer Battery Chargers?
Before the how comes why. Why should you purchase a Schauer charger in the first place? Especially when so many other companies are offering almost the same features? They have almost the same architecture. They promise the same conveniences. Also, they don’t seem lacking in any measure.
But as we all know, the devil lies in the details. Schauer takes the maxim seriously. When other chargers take pride in their quality, Schauer strives to set the industry standard.
When others preach versatility, Schauer Chargers focus on consistent output. With Schauer, you don’t worry about your battery. When others offer quantity, Schauer meets user demands and designs for all climates.
Types of Schauer Battery Chargers: Which One to Buy?
Chargers work best when their designs match your purpose and battery configurations. A float or trickle charger will disappoint if used as a jump starter.
To avoid refunds or replacements, it’s recommended to familiarize yourself with the common charger types and popular models.
Schauer Manual Chargers
Your go-to choice if you love control over your instruments. Manual chargers let you choose volts and switch between sealed and flooded lead batteries. Heavy-duty, durable, and robust build defines them. If you have a legacy Schauer device, it probably uses manual settings.
Schauer Automatic Chargers
Don’t confuse automatic with the latest smart additions. As not all of them offer intelligent adjustability, but they can read the battery type, capacity, and current status. They turn on and off based on your battery’s thirst. Some models, like Schauer JAC2036H, have earned a name for superb features maintain a battery’s fitness.
Schauer Engine Starters
Also known as jumpers, grab one to give your dying battery a lifeful punch. Starter chargers can be manual or automatic. But you can recognize them by their massive output. Some can reach up to 200A.
Schauer Smart Chargers
The finest items in the Schauer inventory. So flexible, you can fit it to any vehicle and connect it without minding analytics and modes. Because in a smart charger, those things are set all by themselves.
They are also more portable and feature modern looks. Schauer JAC2024H is a popular smart model. JAC0524-XLR is also one of the topsolds, but specialized for scooters.
Schauer Multi-Voltage Chargers
A total coverage for your workshop. Also perfect for big garage owners with diverse automotive collections. Instead of a single spec, they feature a range of volts.
Two mentionable models are Schauer JAC2512 and Schauer JAC2024H. You will get metered delivery while charging one vehicle after another.
Pro Tips: Contact online representatives via website or direct hotline for consulting your necessities, and product information before a purchase.
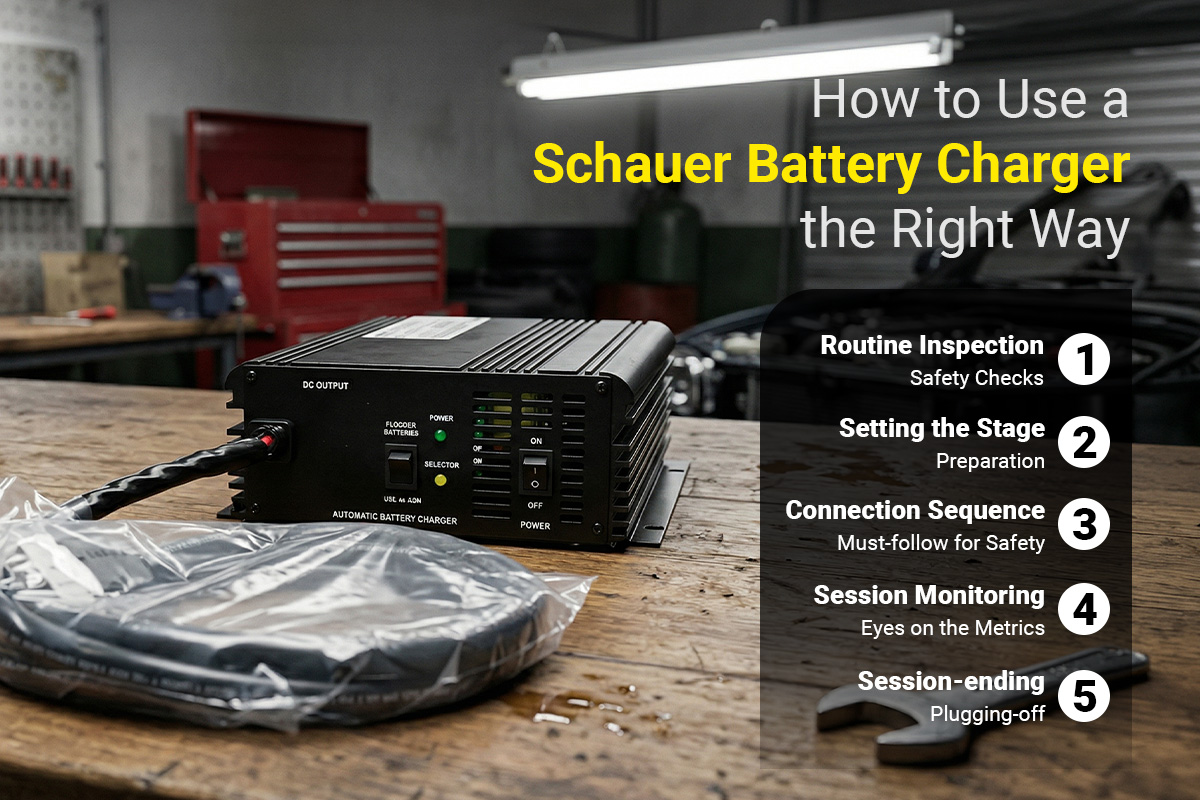
How to Use a Schauer Battery Charger: Key Considerations
A good manual talks about efficiency. It tells you how to get the most for the price you paid. But it also talks about safety. You may find it surprising, but actually a lot depends on how you use a charger. From battery health and mishap rates to your overall satisfaction.
Here is our expert take on the ideal use case. We start even before you plug in.
Routine Inspection: Safety Checks
We suggest you grow a habit on this step. Whenever your hands find a charger, glance at its joints, check for tears, and test the clamps. For multimodal designs, see that the switches are set to the expected modes.
Also, have a curious look at the battery. Connecting a charger to a leaking, compromised, or unsupported battery can cause mutual injury. It may lead to overheating and short circuits on the charger’s side. And damage a battery’s internal circuitry.
Setting the Stage: Preparation
If the clamps spark during charging, it’s probably due to the battery’s input sockets. Either they have corroded or piled up elements inside. Other symptoms of this issue are slow energy flow, heated sessions, and a buzzing noise in the main supply line.
You’d better:
Brush dust and wipe moisture in and around the charging panel
Rub the battery well with a dry piece of clothing or sponge
Sweep the floor or battery stand to get rid of any debris or liquid
Place the charging port tightly into the socket and recheck for loose connections
Connection Sequence: Must-follow for Safety
Don’t plug in the charger right away. Remember one special note on clamps. These scissorhands are always looking for a firework. Attach them to the wrong hooks, or when the charger is already live, you are most likely to get a spark.
Not only this. Batteries produce hydrogen gas from electrolysis. The gas is highly reactive to sparks and has the potential to escalate into a severe disaster. An explosion, for say.
You can easily avoid such incidents by following a connection ritual:
The charger is the last to wire up; wait before you hook the clamps
When clamping, choose the red one first and link it to the cathode
The black clamp is to be set to the anode. Or a bare metal part of the chassis, if possible
Adjust the charger to sync with the battery voltage
Session Monitoring: Eyes on the Metrics
Don’t leave a charger and battery unattended for a long time. Most Schauer chargers feature an analogue or digital ammeter and a set of lights to blurt out the charging status. As a cautious user, what you must ensure is a stable, relentless current curve. Disjointing the connections at the right time helps to keep the instruments in good health.
Session-ending: Plugging-off
Packing off is as vital as the preparation phase. Gone wrong, it may result in a regrettable situation. One mistake is to disjoint in a hurry and leave things like resetting and neutralizing the modes for later.
What you should:
Recheck the readings for one last time
Unplug the charger first
Switch back to the default
Remove the clips from the battery
Restore the charger in a protective box
Risk-Reducing Measures: Special Attentions
There is a reason why it’s said that having a vehicle is a lifestyle choice. As with elegance and comfort, there also come risks. About 40% to 50% car nuances can be linked to charging mechanisms and practices.
To mitigate unusual risks, you need to look beyond charging sessions. In fact, a proper mindset and behaviours will help the most.
Wear Protective Gears: Eyes and skin are the most vulnerable body parts to explosions. Flame, thrusted debris, and acid can all take a permanent toll. Put on glasses, plastic gloves, and coats when charging or troubleshooting a battery.
Remove Metal Jewelleries: Rings, watches, bracelets, specifically handworn accessories, often provoke short circuits. Put them off before every time you go near the battery with charging cables.
Handle Chargers with Care: Always keep them dry, intact, and assembled. If fallen, dropped off hands, or has survived a blow, consult a specialist before replugging.
How to Start Engines with a Schauer Charger?
Chargers able to burst out excessive energy can jump-start engines. They come in high amperage, mostly within 50 to 200 Ah. To thrust up a vehicle, you need to:
Know the recommended cranking time for your vehicle’s model
Charge the battery for at least three minutes before starting cranking
Don’t shock the engine for more than 15 seconds at a time
Keep a 3-minute break between two cranks
Follow the safety measures while connecting the charger and turning it on and off
How to Assemble a Schauer Battery Charger?
All Schauer chargers come assembled in the package. But there are times you may feel the need to dismantle them and reassemble them. A DIY repair or clamp replacements are two common scenarios. While each Schauer model differs from the rest, the screws and cover pairs are mostly the same.
Four sheet metal screws hold the handle to the body
Two thread-cutting screws are for the foot brackets
Four washers are to support the wheels on the axle
What are the Common Troubleshooting for Schauer Chargers?
Schauer battery chargers hardly trip. Most reported problems include:
No DC Output
The yellow light goes off, and the DC compass remains unmoved. Expect one of the three following conditions:
The power source is offline, no input
The DC circuit breaker has broken
The battery is either dead or poorly connected
Weaker Charge Rate
The charger is not bleeding to its fullest capacity. The ammeter pointer drops steeply just after a rise. Check whether:
You are charging a cold battery
The cell is already half-filled
Power supply is poor
Worn-out battery posts
Charger Overload
Perhaps the most frequent issue you will go through while using a charger. It will look like your device is restarting without a notice. Without solid proof, it’s hard to tell the reason. However, a discharged battery, fluctuating current flow, and exceeding voltage are held as the primary cause.
We suggest you:
Match the output voltage of the charger and the input voltage of the battery
Check that the charging clips latch on the right polar plates
Use a larger charger if the circuit breaker has been resetting for 30 minutes
Special Tips
If not anything else, stick to the guidelines below. They are the least you must ensure to make the most of a charging session without compromising safety.
Safety Warning: Connect the charger to the grid after connecting it to the battery. Again, disconnect it from the grid before disconnecting it from the battery.
Expert Insight: Smart chargers can detect dead and short-circuited batteries. Find a manual charger if your cell shows any symptoms of weakness.
Water Levels: Keep the acid level lower than the top margin during a charge. Heat triggers excessive electrolysis, which is bad for the battery's health.
Frequently Asked Questions ( FAQs)
There are some challenges people go through when using a Schauer Battery Charger. Here are the most common ones:
How To Connect A Heavy-Duty Battery Charger To A Car Battery?
There are specific steps to follow to safely connect a charger. Skipping or tripping over them can lead to danger. The general order of actions is:
Clean the battery
Clamp on the right plates
Set the output measure
Enter the charger into the grid
What Types Of Batteries Can Schauer Chargers Handle?
Schauer chargers are made for a diverse range. From golf carts, scooters, to trucks, 1Amp to 20Amp, and 12V to 36V, there is a Schauer charger model for every battery type.
How To Know When A Schauer Battery Charger Is Fully Charged?
The power indicator turning red is the telling sign of a fully charged charger. At this point, a smart or automatic charger shuts down. For manual models, you have to pull them off the sockets.
What Happens If You Leave A Battery Charger On Too Long?
Overloading is the worst you can get from overcharging. The charger breaks out of the flow, takes healing time, and resets to normal. This cycle continues until the battery somehow depletes, the voltage rebalances, or you disconnect the charger.
Ready To Recharge in Minutes with an Original Schauer Battery Charger?
Use it wrongly, and even a powerful charger can take hours to bring your battery to life. Ask any expert, they will advise you to treat the charger with the same importance as the battery. In the long run, they go hand-in -hand, and neglecting one will consequently damage the other.
Beyond quality, promise, and experience, Schauer has a marvelous after-sales service. If you have more questions that our “How to Use a Schauer Battery Charger” guide hasn’t answered, reach out to the team. At any hour in the day, expert ears are waiting to listen to your problems and sort them out.