How Do You Refurbish a Golf Cart Battery? Step-by-Step Guide (2026)
A golf cart battery can often be refurbished through cleaning, charging, desulfation, and testing. The goal is to restore lost capacity and extend battery life. Success depends on battery age, sulfation levels, and overall condition.
In our experience, many owners replace batteries too soon. We have seen batteries recover after proper charging and maintenance. We have also seen batteries fail because internal damage was already present.
If you are asking how to refurbish a golf cart battery, start with testing before repairs. A few simple checks can reveal whether battery reconditioning makes sense. That step alone can save time and money.
This guide explains what works, what fails, and what golf cart owners across the USA should know before spending money. You will learn practical battery refurbishing, maintenance, and restoration methods used to evaluate aging golf cart batteries.
What Does It Actually Mean to Refurbish a Golf Cart Battery?
Battery refurbishing means restoring lost performance in a battery that still has recoverable life. The process often uses controlled charging and desulfation methods. It is not a permanent fix. It is a recovery process with real limitations.
When it comes to efficient golf cart batteries, they last for a long time. However, some golf cart batteries lose performance over time. Sulfation is one of the most common reasons. It occurs when lead sulfate crystals remain on the battery plates for too long. As those crystals harden, the battery stores less energy and delivers less power.
A proper battery reconditioning process focuses on problems that can still be corrected. Corrosion on the terminals can often be removed. Low electrolyte levels can often be restored. Some batteries respond well to desulfation treatments. Others improve after a proper charging cycle.
The terms battery reconditioning, battery restoration, battery maintenance, and battery repair often describe the same general goal. The goal is to recover as much usable performance as possible. The process may improve runtime. It may improve charging efficiency. It may also help delay costly battery replacement decisions.
Results vary from one battery to another. Battery age plays a major role. Internal plate condition also affects the outcome. Severe sulfation can reduce recovery potential. This is why testing comes before refurbishment. A few simple checks can reveal whether the battery is worth saving.
What You Need for Golf Cart Battery Refurbishing
You need a few basic testing tools, a quality charger, and proper safety equipment before starting battery reconditioning. The charger is the most important item on the list. Without accurate testing and proper charging, it is difficult to determine whether a golf cart battery can actually be recovered.
Many refurbishment attempts fail because owners focus only on chemical treatments. The real foundation of successful battery refurbishing is testing and charging. Those two steps provide far more value than any shortcut or miracle solution.
How Do You Refurbish a Golf Cart Battery? Step-by-Step Process
You refurbish a golf cart battery through a series of recovery steps. The process starts with cleaning and inspection. It then moves into charging, desulfation, and performance testing. The goal is to recover as much usable capacity as possible before considering battery replacement.
Step 1 - Precautions for Golf Cart Battery Reburbishing
Before you begin, wear gloves and eye protection. Battery acid can cause serious injury. Work in a ventilated area and keep open flames away from the battery.
Take your time with each step. Most battery reconditioning failures happen because owners rush the process. A battery may need several hours or even several days to show improvement.
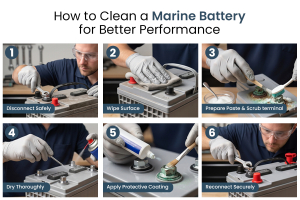
Step 2 - Clean the Battery Terminals and Remove Corrosion
Mix a small amount of baking soda with water. Apply the solution to the battery terminals and cable connections. The reaction helps neutralize acid residue and loosen corrosion.
Use a brush to remove all visible buildup. Continue until the metal surfaces are clean. Rinse the area with clean water and allow it to dry completely.
Clean terminals improve electrical flow. They also help produce more accurate voltage readings. This makes every step that follows more reliable.
Examine the terminals before moving on. Look for cracks. Check for severe pitting. Inspect the cable connections for looseness. Physical damage may need repair before refurbishment can continue.
Step 3 - Check and Restore the Electrolyte Level with Distilled Water
Remove the battery caps and inspect each cell. The electrolyte should cover the battery plates. If the plates are exposed, correct that issue before charging the battery.
Add distilled water slowly. Add only enough to cover the plates. Avoid filling the cells to the top.
Never use tap water. Minerals inside tap water can affect battery performance. Over time, those contaminants may increase wear inside the battery.
Allow the battery to rest after adding water. This gives the electrolyte solution time to stabilize. More accurate testing can then take place.
Step 4 - Run a Full Charge and Equalization Cycle
Connect a smart charger and perform a complete charge cycle. Allow the battery to reach full charge before moving to the next step. Partial charging limits the effectiveness of the recovery process.
After the battery reaches full charge, use an equalization charge if your charger offers that setting. Equalization helps bring the cells closer to balance. It can also reduce mild sulfation that has developed over time.
Monitor the battery during charging. Warm temperatures are normal. Excessive heat is not.
Stop the process if the battery becomes very hot. Excess heat often points to internal problems. Further charging may cause additional damage.
Step 5 - Desulfate the Battery
Sulfation is one of the most common reasons a lead-acid battery loses capacity. It develops when sulfate deposits remain on the battery plates for extended periods. Those deposits become harder to remove as time passes.
An electronic desulfation charger may help break down some of those deposits. Follow the manufacturer's instructions and allow the treatment to run for the recommended period.
Check the battery before treatment begins. Record the voltage reading. Check it again after the treatment ends. Improvement suggests that recovery is taking place.
Keep your expectations realistic. Desulfation can help batteries with mild or moderate sulfation. It cannot reverse every type of battery damage.
Step 6 - The Epsom Salt Method: What It Does and Does Not Fix
The Epsom salt method remains a popular form of battery restoration. Epsom salt contains magnesium sulfate. Some owners use it when trying to recover a weak flooded battery.
Prepare the solution according to the instructions for your battery type. Replace a small amount of electrolyte with the solution. Recharge the battery fully after the treatment.
This method should be viewed as a supplemental treatment. It is not a miracle cure. Many batteries that respond to Epsom salt would also respond to proper charging and desulfation.
It is important to understand the limits of this approach. Epsom salt cannot repair a shortened cell. It cannot repair broken plates. It cannot restore a battery that has suffered severe internal deterioration.
Step 7 - Load Test the Battery to Confirm Recovery
A battery load test is the final step in the process. It confirms whether the battery can perform under real operating conditions. This test matters more than resting voltage alone.
Apply an appropriate load and monitor the battery response. A healthy battery should maintain a stable voltage during the test. A weak battery will show a rapid voltage drop.
Many batteries appear healthy when no load is present. The truth becomes clear when demand is placed on the battery. This is why load testing is essential.
A battery that passes the load test may be ready for continued service. A battery that fails the test is usually a better candidate for battery replacement. At that point, additional refurbishment attempts rarely provide meaningful gains.
Why Golf Cart Batteries Fail and Whether They Can Be Refurbished
Golf cart batteries typically fail because sulfation reduces their ability to store energy. Low electrolyte levels can further accelerate capacity loss. Many of these problems can be improved through battery refurbishing when they are discovered early.
Battery failure is usually a gradual process. Performance declines little by little. Many owners do not notice a problem until runtime drops sharply or the cart struggles to hold a charge.
Some causes of battery failure are reversible. Others are not. Before spending time on battery reconditioning, it helps to understand what causes batteries to lose capacity and which battery types actually respond to refurbishment.
Why Lead Acid Golf Cart Batteries Lose Capacity Over Time
Sulfation is the leading cause of capacity loss in a lead-acid battery. The process begins when a battery remains partially discharged for extended periods. Sulfate deposits form on the battery plates and become harder as time passes.
As sulfation increases, battery performance declines. The battery stores less energy during charging. It also delivers less power during use. This leads to shorter runtime and weaker overall performance.
Partial charging contributes heavily to the problem. Many owners use their cart briefly and postpone a full recharge. Repeating that habit allows sulfate deposits to continue building on the plates.
The electrolyte level also affects battery health. Water gradually evaporates during normal operation. If the plates become exposed, permanent damage can occur. Many 6-volt golf cart battery failures result from years of sulfation combined with poor water maintenance.
Which Battery Types Can Be Refurbished (And Which Cannot)
Flooded lead-acid battery systems are the best candidates for battery restoration. They provide access to the electrolyte through removable caps. That access makes testing, maintenance, and recovery procedures possible.
Many flooded batteries respond well to proper charging. Some also respond to desulfation treatments. The outcome depends on how much internal damage has already occurred.
AGM batteries are different. They are sealed from the factory. Standard battery repair methods cannot be performed because the electrolyte is not accessible.
Lithium batteries cannot be refurbished using lead-acid recovery techniques. Their chemistry works differently. Their failure patterns are also different. Before starting any refurbishment project, confirm which battery type is installed in your cart. This simple step can prevent wasted effort and unnecessary battery replacement costs.
Can a Dead Golf Cart Battery Be Saved? Test It Before Refurbishing
Yes, some dead golf cart battery problems can be fixed. Others cannot. A few simple tests can tell you which category your battery falls into. This step can save hours of work and prevent wasted money.
Many owners jump straight into battery refurbishing. That approach often backfires. A battery with a failed cell will not respond to most recovery methods. Testing reveals whether the battery is actually worth saving.
The good news is that basic testing is simple. You do not need expensive equipment. A voltage test and a specific gravity test provide most of the information you need.
Before attempting any battery reconditioning, gather real data. Measure voltage. Check electrolyte condition. Look for signs of physical damage. Those results will help determine whether refurbishment makes sense.
A quick evaluation process can help identify whether a dead golf cart battery is worth saving:
Step 1: Inspect the battery case for cracks, swelling, leaks, or other visible damage.
Step 2: Check the electrolyte level and confirm the battery plates remain covered.
Step 3: Measure the resting voltage of each battery with a digital multimeter.
Step 4: Perform a hydrometer test and record the specific gravity reading for each cell.
Step 5: Compare the results and look for major differences between cells or batteries.
Step 6: Proceed with refurbishment only if the battery shows realistic recovery potential.
How to Do a Resting Voltage Test on Golf Cart Batteries
A resting voltage test measures battery voltage after charging and usage have stopped. It is one of the quickest ways to assess battery health. Allow the battery to rest for at least one hour before taking a reading.
Use a digital multimeter and test each battery individually. Record every reading. Comparing batteries within the same pack often reveals hidden problems.
Battery Type | Healthy Resting Voltage | Possible Recovery Range | Usually Beyond Recovery |
6 Volt Battery | 6.2V to 6.4V | 5.5V to 6.0V | Below 5.0V |
8 Volt Battery | Above 8.2V | 7.2V to 8.0V | Below 7.0V |
12 Volt Battery | Above 12.4V | 11.5V to 12.2V | Below 11.0V |
These numbers are guidelines rather than guarantees. One battery may recover while another may not. The voltage reading simply provides a starting point for further evaluation.
A battery that reads far below its rated voltage after a full charge attempt is a poor candidate for refurbishment. Internal damage is often the cause. Further testing can confirm that suspicion.
How to Use a Hydrometer to Check Specific Gravity
A hydrometer measures electrolyte density. This specific gravity reading helps reveal the condition of each battery cell. It is one of the most useful tests available for a flooded lead-acid battery.
Step 1: Remove the battery caps carefully and inspect the electrolyte level in each cell.
Step 2: Draw electrolyte into the hydrometer and record the reading for the first cell.
Step 3: Repeat the process for every remaining cell and write down each reading.
Step 4: Compare the results across all cells. A healthy cell typically produces a reading between 1.265 and 1.299.
Step 5: Look for low readings that may indicate sulfation or a weak state of charge.
Step 6: Check for large differences between cells. Significant variation often points to internal damage or a failing cell.
A hydrometer does more than measure charge levels. It helps identify weak cells that voltage testing may miss. This information can help determine whether battery reconditioning or battery restoration is likely to succeed.
6 Signs Your Golf Cart Battery Is Past the Point of Refurbishing
Some batteries cost more to save than they are worth. When the following warning signs appear, battery replacement is usually the smarter option.
Warning Sign | What It Usually Means |
Resting voltage remains extremely low after charging | Severe internal damage |
Large specific gravity differences between cells | Failing or damaged cell |
Dark sediment visible inside the battery | Plate shedding |
Swollen or cracked battery case | Heat damage or internal failure |
Repeated capacity loss after previous repairs | End-of-life battery |
Battery refuses to accept a charge | Permanent internal failure |
You should strongly consider replacement when multiple warning signs appear together.
The battery remains weak after a full charging cycle.
Capacity drops again shortly after refurbishment.
Physical damage is visible on the case.
Testing shows one cell performing far worse than the others.
If two or more batteries in the same pack show these problems, replacing the entire set is often the better investment. Mixing heavily degraded batteries with stronger batteries usually shortens the life of the entire pack.
Tools and Materials for Battery Refurbishing
The following tools are recommended before you begin:
• Digital multimeter or voltmeter
• Battery hydrometer for specific gravity testing
• Battery load tester for battery load test
• Smart battery charger with desulfation mode
• Charger with equalization charge capability
• Wire brush or terminal cleaning tool
• Plastic syringe or battery filler for electrolyte handling
The following materials are also helpful:
• Distilled water for electrolyte levels restoration
• Epsom salt for optional magnesium sulfate treatment
• Baking soda for corrosion removal and neutralizing acid
• Battery terminal protector spray for long-term protection
• Clean rags or paper towels
Tool or Material | Why It Matters |
Digital Multimeter | Measures battery voltage and identifies weak batteries |
Hydrometer | Shows condition of individual cells using specific gravity reading |
Battery Load Tester | Confirms real performance under load |
Smart Charger | Supports safe charging and lead sulfate crystal breakdown |
Distilled Water | Restores electrolyte without contamination |
Baking Soda | Neutralizes acid and removes corrosion safely |
A quality smart battery charger deserves special attention. It is often the most important tool in the entire battery reconditioning guide process. A charger with desulfation capability helps break down lead sulfate crystals that reduce capacity. It also improves charging accuracy compared to older manual systems.
Safety Equipment You Cannot Skip
Battery electrolyte contains sulfuric acid. Contact with skin or eyes can cause serious injury. Every golf cart battery repair process must be treated as chemical handling.
Before working on any lead-acid battery, wear the following safety equipment:
• Acid-resistant gloves for full hand protection
• Safety glasses or face shield for splash protection
• Long sleeves and closed-toe shoes
• Protective clothing that covers exposed skin
Work only in a well-ventilated area. Batteries release hydrogen gas during charging. This gas becomes highly flammable in closed spaces.
Keep a baking soda solution nearby during work. It helps neutralize acid spills quickly. Never smoke near batteries. Never use open flames near charging equipment. A single spark can create a dangerous situation.
Frequently Asked Questions About Golf Cart Battery Refurbishing
Before making a decision about battery reconditioning, it helps to understand the most common real-world questions. These answers focus on practical limits, not theory or assumptions.
Can you bring a dead golf cart battery back to life?
Yes, but only if the battery still shows usable resting voltage. A golf cart battery with above 5 volts and no shorted cells can often recover.
How long does golf cart battery refurbishing take?
Most battery reconditioning processes take about 3 to 5 days. This includes charging cycles, desulfation, and final load testing.
Is the Epsom salt method for golf cart batteries safe?
Yes, but only for flooded lead-acid batteries with removable caps. It must be used in small measured amounts for each cell.
What is the best charger for golf cart battery refurbishing?
A smart charger with desulfation mode and equalization charge is the best option. It helps restore balance across cells and improves recovery success rates.
Can you refurbish AGM golf cart batteries?
No, AGM batteries cannot be reconditioned using electrolyte methods. They are sealed and require full battery replacement when they fail.
How do you know if a golf cart battery cannot be refurbished?
Very low voltage or uneven cell readings are strong failure signs. Visible sediment or plate damage also confirms permanent battery failure.
Does refurbishing a golf cart battery actually save money?
Yes, but only for batteries with mild sulfation and good structural health. Older batteries with heavy damage usually cost more to attempt than replacement.
Choose the Right Golf Cart Battery Solution
If you are still asking how do you refurbish a golf cart battery, the first step is always proper testing. Accurate voltage checks and cell readings matter more than any repair method. Good decisions come from data, not assumptions.
A golf cart battery can sometimes recover with correct charging, desulfation, and maintenance. But many batteries reach a point where internal plate damage cannot be reversed. At that stage, refurbishment only provides short-term results.
In the USA, Impact Battery provides replacement golf cart battery systems built for long-term performance. They focus on complete pack reliability rather than short-term repair attempts. Their systems are designed to reduce downtime and maintain consistent power delivery in real-world use.