How to Convert a Golf Cart to Lithium Battery Without Shocking Your Wallet

Golf carts are useful for everyday travel. Many people use them in neighborhoods, campgrounds, and on large properties.
The problem is that many older carts still use lead-acid batteries. Over time, they become less efficient. Charging takes longer, maintenance becomes a regular task, and the driving range often starts to shrink.
That's when many owners start looking into how to convert golf cart to lithium battery one. A golf cart lithium battery upgrade can reduce weight, improve performance, increase runtime, and eliminate most routine battery maintenance.
The good news is that the conversion is usually easier than people expect. With the right battery and a few basic tools, you can complete the upgrade yourself. Let's look at what the process involves.
Why Choose a Lithium Battery Upgrade for Golf Carts
Upgrading to a lithium golf cart battery eliminates daily maintenance, reduces dead weight by up to 300 pounds, and extends your battery lifespan to over 10 years. This simple swap provides steady power without slowing down on steep hills, saving you both time and replacement costs over the life of your cart.
Silent, quick, and worry-free. But here's the best part, you will never have to clean messy battery acid or top off distilled water on a Saturday morning again.
Traditional lead-acid batteries waste up to 30% of energy as heat, whereas lithium packs convert nearly 95% of electricity directly into raw power.
Instead of replacing worn-out cells every three years, you get a durable, reliable power source like a rugged 24V lithium battery that charges up in half the time.
And for most busy cart owners, that makes the decision incredibly easy. Ultimately, this upgrade turns your sluggish utility vehicle back into a fast, fun ride.
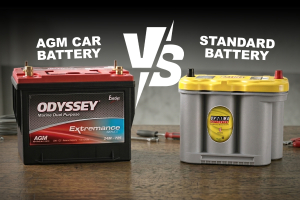
Lead-Acid vs. Lithium Battery: Side-By-Side Comparison
Golf cart users choose lithium batteries for a simple reason. They deliver smoother performance, faster charging, and less maintenance. No more battery acid cleanup, heavy upkeep, or the limitations of traditional lead-acid batteries. Let us look closely at the actual performance data comparing these two battery types.
Key Performance Metrics | Flooded Lead-Acid Batteries | LiFePO4 Lithium Batteries | Direct Performance Impact |
Service Lifespan | 300 – 500 charge cycles | 3,000 – 5,000+ charge cycles | Up to 10x longer lasting |
Physical Weight | 350 – 450 lbs (average pack) | 70 – 150 lbs (average pack) | Less turf compaction, higher speed |
Electrolyte Maintenance | Regular distilled water top-offs | Maintenance-free solid construction | Zero corrosion, no acid leaks |
Usable Capacity (DoD) | 50% Safe Depth of Discharge | 100% Depth of Discharge | Twice the runtime per rated Ah |
Voltage Sag | Drops as battery drains (slows down) | Flat discharge curve (full power always) | Consistent speed even on steep hills |
Traditional lead-acid batteries wear down faster and lose power as they drain, causing your cart to slow down during use. Lithium-ion batteries deliver consistent power from start to finish, so your cart performs the same at 10% charge as it does at 100%. Next, let's look at how to choose the right setup for your cart model.
How to Select the Right Lithium Battery for Your Golf Cart
Selecting your new power source requires matching your machine's physical space and electrical needs.
Finding the right lithium battery for your golf cart is all about planning ahead. You need to look at three main specifications: voltage, capacity, and current output. Let us break these down one by one so you can buy with total confidence.
Matching Your System Voltage: 36V vs 48V Lithium Golf Cart Battery Setup
Before buying a new battery, make sure you know the voltage your golf cart requires. Matching your cart's original voltage is important for safe and reliable operation. Most golf carts use either a 36V or 48V battery system.
To find your cart's voltage, lift the seat and inspect the batteries. Count the caps on one battery and multiply that number by 2 to determine the battery's voltage. Then multiply the battery voltage by the total number of batteries in the cart to find the system voltage.
6-Volt Batteries (3 caps per battery): Six of these equal a 36V system. A 36v lithium golf cart battery is the direct replacement.
8-Volt Batteries (4 caps per battery): Six of these equal a 48V system. A 48v lithium golf cart battery is the direct replacement.
12-Volt Batteries (6 caps per battery): Four of these equal a 48V system. A 48v lithium golf cart battery also applies here.
Keep in mind that feeding a 36V motor 48 volts can burn out your electronics, so make sure to match the numbers exactly.
Determining Golf Cart Lithium Battery Range & Capacity (Ah)
Your golf cart lithium battery range depends on the battery's amp-hour (Ah) rating. A higher Ah rating provides more driving range between charges. Choose a battery based on how you typically use your cart:
50Ah–60Ah: Best for 18 holes of golf or short neighborhood trips. Provides about 15–20 miles of range.
105Ah: A good choice for lifted carts, hilly areas, or off-road use. A 12V 100Ah lithium pack provides about 30–40 miles of range.
150Ah–160Ah: Ideal for commercial use, hunting trips, or longer daily drives. Provides about 50–65+ miles of range.
Navigating the Amperage Trap
When shopping for a lithium golf cart battery, don't focus only on amp-hours (Ah). You also need to check the battery's continuous discharge rating.
Every lithium battery has a built-in Battery Management System (BMS) that protects the battery from excessive current draw.
If your cart requires more power than the BMS can provide, the battery may shut down during acceleration or when climbing hills. For most standard golf carts, a battery with a BMS rated for at least 100A continuous discharge is recommended.
If you have a lifted cart, a larger motor, or frequently drive on steep terrain, look for a BMS rated between 150A and 200A continuous discharge.
Required Tools and Materials for Installing a Lithium Battery in a Golf Cart
Having the correct equipment nearby keeps your project moving quickly and safely. When you are installing a lithium battery in a golf cart, physical preparation is key.
Fortunately, this project does not require specialized automotive tools. A golf cart lithium kit typically comes with most of what you need. Here is a quick checklist of everything you should have on hand before opening your battery compartment:
Safety Equipment: Rubber-dipped work gloves, safety glasses, and a box of baking soda to neutralize old battery acid.
Hand Tools: A socket wrench set (insulated handles are best), a wire brush, and a heavy-duty cable terminal crimping tool.
Supplies & Materials: Heavy-gauge battery cables (2AWG or 4AWG), terminal protection grease, heavy-duty zip ties, and structural battery tray spacers.
All of them are regular hardware tools that you can get at your local store for about 80 bucks. Now, let us look at how these pieces fit together.
Complete Step-by-Step Golf Cart Lithium Battery Conversion Process
Ready to get your hands dirty? The entire golf cart battery conversion process is highly logical and straightforward. Just take your time, follow each phase closely, and keep your safety gear on. We will guide you through every turn of the wrench.
Step 1: Pre-Install Safety Prep and Placing the Cart in Tow Mode
Park the cart on a flat surface. Set the park brake. Pull out the key. Find the Run/Tow switch. It is usually under the seat. Flip it to "TOW."
This step is important. The TOW setting cuts power to the motor controller. Without it, a power surge can damage the controller when you reconnect the new battery.
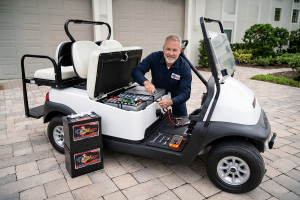
Step 2: How to Remove Old Lead-Acid Batteries from the Tray Safely
Lead-acid batteries are heavy and full of acid. Work slowly. Wear your gloves and goggles.
Unbolt the main negative cable first.
Unbolt the main positive cable.
Remove the series jumper wires between batteries.
Remove the battery hold-down brackets.
Lift each battery out one at a time. Use a battery lift strap. These batteries can weigh 60–70 lbs each.
Step 3: Cleaning, Neutralizing Acid, and Repairing the Metal Battery Tray
Old battery trays collect acid, rust, and grime. Clean the tray before the new battery goes in.
Mix one cup of baking soda with one quart of warm water. Pour it over any white or crusty buildup. It will fizz. That means it is working. The baking soda cancels out the acid. Scrub the tray with a wire brush. Rinse it with water and let it dry.
DIY Tip: After it dries, spray the tray with anti-corrosion primer or a truck bed liner coating. This stops rust from coming back. It also protects against any future leaks.
Step 4: Special Instructions for Club Car Lithium Battery Conversion (OBC Bypass)
This step only applies to Club Car Precedent and DS models. These carts have an On-Board Computer (OBC). The OBC controls when the charger can run. It was built for lead-acid charging. It will block a lithium charger from working.
You need to bypass it. Here is how:
Find the wiring harness at the OBC.
Splice the blue and white wires together. This signals the OBC to allow charging at any time.
Route the charger receptacle's negative wire directly to the controller ground.
This removes the OBC from the charging loop. Your lithium charger will now work without interference.
Step 5: Installing and Securing the New Lithium Golf Cart Battery Pack
Lower your new lithium pack into the battery tray. Most single-pack units drop right into the space the old batteries left. If you use modular GC2-style packs, place them in the same order shown in your battery's instruction guide.
Tip: Lithium packs are much smaller than lead-acid packs. Use foam spacers or tray inserts to fill any empty bays. This stops the battery from sliding around when you drive.
Secure the battery with the hold-down bracket. Give it a firm shake. It should not move at all.
Step 6: Wiring the Main Terminals and Installing a 48V to 12V DC Converter for Accessories
Connect the negative cable first. Then connect the positive cable. Tighten all terminals firmly.
Do not tap into one battery cell to power your lights, radio, or horn. This causes cell imbalance. It drains one section of the battery faster than the rest. It shortens the life of the whole pack.
Wiring Warning: Always use a dedicated DC-to-DC converter for accessories. Wire a 48V-to-12V converter (or 36V-to-12V for 36V carts) directly to the main battery terminals. This pulls power evenly from the full pack. It keeps every cell balanced.
Charging, Calibration, and Post-Installation Suspension Fine-Tuning
After installing your new lithium battery, there are a few important steps to complete before driving your cart. These steps help ensure your battery system works properly and your cart rides smoothly after the weight change.
Use the Right Lithium Charger
Always use a charger designed for LiFePO4 lithium batteries. Do not use your old lead-acid charger, as it can damage lithium cells and cause battery issues.
Choose a charger that:
Matches your battery's voltage
Has a LiFePO4 charging profile
Includes automatic shut-off protection
Once installed, fully charge the battery to 100% before using the cart.
Install and Calibrate a Battery Monitor
Many factory battery gauges rely on voltage readings, which are not accurate for lithium batteries. Lithium batteries maintain a steady voltage until they are nearly empty.
For accurate battery level readings, install a shunt-based battery monitor. This device measures the power going into and out of the battery, giving you a more accurate estimate of remaining charge and driving range.
After installation, fully charge the battery to calibrate the monitor.
Check Suspension and Tire Pressure
Lithium batteries are much lighter than lead-acid batteries. Removing the extra weight can change how your cart sits and rides.
After installation:
Check that the cart sits level.
Inspect the rear suspension for any changes in ride height.
Reduce rear tire pressure by 2–4 PSI if the ride feels too firm.
These simple adjustments can help improve comfort and handling with your new lithium battery setup.
Lithium Batteries Charging Limits In Low-Temperature
Lithium batteries do not like cold charging. Charging below 32°F (0°C) can cause lithium plating inside the cells. Lithium plating causes permanent damage. It shrinks the battery's capacity over time.
Store and charge the cart in a heated space during winter. If your cart lives outside, look for a battery with a built-in low-temperature cutoff. Some premium packs also have self-heating cells. These warm up before charging begins. Here's the winter storage rules:
Fully charge the battery before storing it.
Disconnect the main terminals to stop any slow power drain.
Store the pack at 50–80% charge. A full charge or a dead charge both shorten battery life during long storage.
Frequently Asked Questions (FAQs)
Making the switch can bring up a lot of questions. Let us clear up the most common concerns cart owners have when converting their golf cart from lead-acid to lithium batteries.
Can I charge a lithium golf cart battery with my old charger?
No, you must never use a standard lead acid charger on your new lithium battery pack. These old chargers use high voltage cycles that will quickly ruin your new lithium cells. Instead, always buy a dedicated LiFePO4 charger. This simple choice keeps your system safe.
Do I need to replace my stock controller for lithium?
No, your stock motor controller will work fine with a new lithium battery setup if the voltages match. Just ensure your new lithium battery has a high continuous discharge rating. This key rating prevents the system from shutting down when you hit the accelerator pedal.
How do I store a lithium golf cart battery in winter?
Unlike lead acid options, you should not leave your lithium battery plugged into a charger all winter long. Instead, charge the pack to around eighty percent capacity before storage. Disconnect the main cables to prevent any slow parasitic draw from draining your entire system dry.
Can I charge my lithium golf cart battery in freezing weather?
No, charging a lithium battery below freezing will cause permanent internal damage to the chemical cells. You can safely drive your cart in cold weather, but always recharge it in a warm garage. Alternatively, buy a self heating battery to prevent this cold weather issue.
Do I need to wire a voltage reducer for my 12V lights?
Yes, you must install a voltage reducer to power your accessories safely without unbalancing the cells. Tapping into a single battery in a lithium system will cause dangerous power issues. This small converter steps the full voltage down to a safe twelve volts for lights.
Upgrade Your Golf Cart from Lead-Acid to Lithium Batteries
Your golf cart still works, but may not feel as smooth or reliable as it once did. Slow acceleration, extended charging times, and frequent battery maintenance take away from every ride experience.
Many owners start looking for a better option offering improved performance and less upkeep. They want longer range, quicker charging, and reduced maintenance year-round. Lithium batteries provide that upgrade.
They are lighter, more efficient, and greatly enhance overall cart performance. Hope you now know how to convert golf cart to lithium battery.
With the right golf cart lithium kit, compatible components, and basic preparation, this lithium battery conversion can be done. Once completed, your golf cart lithium conversion delivers a cart that feels more responsive, lighter, and far more convenient to use.