Is Your ATV Battery Charging Correctly? Here's How to Test
Nothing kills a thrill faster than an engine that stays silent when you’re miles out. A sudden power failure turns a great ride into a long walk home. Spotting power issues early keeps you on the trail where you belong.
A dead ATV battery is a ride killer. So, is your ATV battery charging correctly? A proper check tells you if the battery or the machine is at fault.
Knowing how to troubleshoot helps you avoid high costs and stay in the driver's seat. This guide explains the full ATV battery charging test process from start to finish. You will learn to find power issues before they ruin your next weekend adventure.
Why an ATV Battery Charging Test Matters
An ATV battery charging test matters because it shows if the battery is getting the power it needs while the engine runs. It also helps catch charging issues early before they lead to weak starts or a dead battery on the trail.
A reliable ATV battery gives the starter the power it needs to crank the engine. After that, the charging system should help restore the power used during startup. When this process fails, the battery gets weaker after every ride.
The ATV battery charging test compares battery voltage before and after the engine runs. The difference shows whether the system is sending charge back to the battery. This makes the test useful for riders dealing with weak starts or dead batteries.
Running a few checks can save you from throwing money away. A new battery can die again if the real issue is the regulator, stator, wiring, or accessory drain. Testing gives a better answer before replacement becomes the next step.
Understanding Your ATV Charging System
An ATV’s power network is a straightforward energy loop. While the engine runs at various RPM levels, the stator produces raw alternating current (AC). This energy is then sent to the voltage regulator for essential processing.
The voltage regulator converts that AC into stable direct current (DC) for the vehicle. It also caps the output to protect sensitive electronics from power surges. This refined electricity then flows back to charge your battery during the ride.
If any of these components fail, the battery won't charge properly. Many riders blame the battery first, but a full ATV charging system test is the only way to pinpoint the actual point of failure.
Common Signs of ATV Charging Issues
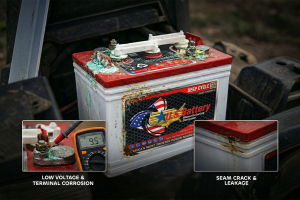
Recognizing early warning signs is the best way to prevent a complete breakdown on a remote trail. The most obvious indicator of charging issues is an engine that cranks very slowly during ignition. You might also notice that the headlights appear unusually dim when the engine is idling at a low speed.
Another common symptom is an ATV battery not holding a charge after a long day of riding. It often indicates that the vehicle is draining power faster than it can replenish its energy. A rider may find themselves needing a jump start every time they stop for a short break.
Sometimes the dashboard warning lights will flicker while the vehicle is in motion. This suggests that the electrical components are receiving an inconsistent flow of energy. Addressing these symptoms early is crucial for maintaining a healthy ATV battery.
The table below demonstrates the signs of ATV charging issues and points out the possible causes:
Symptom | Primary Cause | Recommended Step |
Engine cranks slowly | Low charge or aging cells | Charge the battery and check the voltage. |
Rapid clicking sound | Poor connection or low power | Clean and tighten the cable terminals. |
Dim or flickering lights | Weak charging output | Test the battery while the engine is running. |
Battery dies during use | Faulty charging system | Inspect the stator and voltage regulator. |
Battery drains overnight | Parasitic power draw | Check for accessories left on or wiring leaks. |
Full voltage but won't start | Internal capacity failure | Use a battery tester to check for a dead cell. |
How to Test ATV Battery Charging Correctly
Testing works best when the battery is checked in stages. Resting voltage shows the battery’s current charge level. Running voltage shows whether the ATV is sending charge back while the engine is on.
A battery tester adds another useful layer. It shows whether the battery can handle starting demand. This matters because voltage alone can look normal at rest on a weak battery.
The full picture comes from several checks together. ATV battery voltage, load strength, cable condition, and running output all matter. This approach keeps the diagnosis more accurate and less expensive.
Tools That Help With ATV Battery Testing
Here are some essential tools that help with ATV battery testing:
Digital Multimeter: This tool gives an accurate reading of the battery’s current voltage.
Battery Tester: This tool helps check if the battery can hold power under load.
Smart Charger: A smart charger restores power safely through controlled charging cycles.
Terminal Brush: This helps keep contact points clean for a stronger connection.
Basic Hand Tools: These help with cable checks, loose terminals, and small connection issues.
Owner’s Manual: The manual gives the correct voltage range for the specific ATV model.
How to Test ATV Battery Charging with a Multimeter
The most common method to test an ATV battery with a multimeter involves checking the voltage while the engine is off and running. The technician sets the dial to the DC voltage setting before touching the leads to the terminals. This initial reading provides a baseline for the resting state of the power cells.
The next step is to observe the display while the engine is running at a moderate speed. A functional system will show a higher number than the resting voltage as the stator sends power back. This ATV battery voltage test is the fastest way to see if the alternator is doing its job.
Many people find that testing ATV battery charging is a simple process once they have the right tools. The red probe always goes to the positive terminal while the black probe connects to the negative side. Consistency in your testing method keeps your data accurate over time.
ATV Battery Voltage Test Before the Engine Runs
The first reading is the resting ATV battery voltage. This means the ATV is off and the battery has had time to settle. The reading gives a basic idea of how much charge is available.
A fully charged 12-volt lead-acid ATV battery often reads around 12.6 to 12.8 volts. A reading near 12.2 volts usually means the battery is low. A reading under 12 volts often means the battery is deeply discharged.
This test is helpful, but it does not prove the battery is strong. A weak battery may show fair voltage and still fail under load. That is why a battery tester gives more useful details.
Before you start the engine, a quick voltage test will tell you exactly how much energy is left in the tank. You can use the following table to determine if your battery is ready for the trails:
Battery Voltage | Condition | What It Means |
12.6V to 12.8V | Full Charge | Your battery is healthy and ready for testing. |
12.4V to 12.5V | Partly Charged | It’s okay, but top it off before doing a load test. |
12.2V to 12.3V | Low Charge | Power is dipping; your starter might feel sluggish. |
12.0V to 12.1V | Very Low | The battery is deeply discharged and needs a recharge. |
Below 12.0V | Severely Low | Critical levels. Charge it slowly and retest to see if it holds. |
10.5V or Lower | Potential Failure | Usually a sign of a dead cell; the battery likely needs replacing. |
ATV Battery Voltage While the Engine Is Running
Running voltage shows whether the charging system is doing its job. The voltage should rise above the resting reading after the engine starts. This rise is one of the clearest signs that charging output is reaching the battery.
Many 12-volt ATV systems show around 13.5 to 14.5 volts while running. The exact range can change by model, engine speed, and battery type. The owner’s manual gives the most accurate range for a specific ATV.
Low running voltage can point to a weak charging output. A very high running voltage can point to a voltage regulator problem. Both conditions can create repeat charging issues and shorten battery life.
Running Voltage | Likely Meaning | What to Inspect |
13.5V to 14.5V | Healthy Output | The system is working well. If issues persist, check for parasitic drains. |
Below 13.0V | Weak Charging | The stator or regulator may be failing, or you have a blown fuse. |
No Change from Resting | Not Charging | The charging path is likely "open." Check for broken wires or plugs. |
Above 15.0V | Overcharging | The voltage regulator is failing. Stop immediately to avoid "cooking" the battery. |
Drops with Lights On | High Electrical Load | Your accessories (winch, lights, etc.) may be exceeding system limits. |
How a Battery Tester Finds the Real Problem?
A dedicated battery tester gives more detail than a basic voltmeter. It puts a simulated load on the battery to see how it performs during a start. This helps find a battery that shows good voltage but has no real power.
Professional shops use these testers to decide if an ATV battery replacement is needed. Sometimes a battery can hold a charge but still lack the cranking amps to start a cold engine. The tester gives a clear pass or fail reading based on internal resistance.
Riders who want an ATV battery that holds a charge may benefit from a basic load tester. It is useful for anyone who maintains several vehicles or seasonal equipment. This tool makes troubleshooting charging problems faster and easier during riding season.
When to Consider an ATV Battery Replacement?
Sometimes a dead ATV battery is simply too old to be revived by a charger. Most lead-acid units have a lifespan of three to five years. If the cells have been left dry or fully discharged, the internal damage is usually permanent.
An ATV battery replacement is the best choice when the unit fails a professional load test. Trying to limp along with a weak battery will eventually damage your starter motor and your solenoid. High-quality replacements provide the peace of mind that your machine will start in any weather.
Investing in a high-performance ATV battery provides your accessories with plenty of power. Winches and extra lights put a massive strain on the electrical reserves of the machine. A premium battery can handle these loads without dropping below the critical voltage threshold.
Common ATV Battery Testing Mistakes
Small testing mistakes can give you the wrong result during an ATV battery charging test. A weak battery can also affect the reading during an ATV charging system test. The multimeter setting matters too because the stator uses AC power while the battery and accessories operate on DC power.
Here are some of the common ATV battery testing mistakes:
Testing with a weak or damaged battery can make good charging parts look faulty.
Using the wrong multimeter setting can give useless readings.
Ignoring cold weather can lead to poor results during an ATV battery voltage check.
Testing a frozen battery can make the voltage look worse than it really is.
Common Charging Mistakes
Charging mistakes can also damage a small powersports battery. A high-amp automotive charger can push too much current into an ATV battery. A low-amp smart charger is usually safer for slow charging and better battery care.
Here are some common charging mistakes when it comes to ATV batteries:
A high-amp charger can overheat or damage the battery.
A frozen battery should not be charged until it warms up.
Long storage can cause parasitic drain if cables stay connected.
Poor charging habits can shorten battery life and cause weak starts.
These mistakes often lead riders to replace parts they may not need. Careful testing helps separate a bad battery from a real charging system issue. Better charging habits also help keep a ready-to-ride ATV battery strong through the riding season.
Frequently Asked Questions (FAQs)
Here are some of the most common questions riders ask when troubleshooting their battery and charging issues.
What is an ATV charging system test?
An ATV charging system test is a check to see if your engine sends power back to the battery while you ride. It measures the voltage difference between a resting engine and a running one.
What voltage should a fully charged ATV battery show?
A healthy 12-volt battery should sit between 12.6 and 12.8 volts at rest. A lower reading typically means the battery is discharged or aging.
What voltage should an ATV show while running?
Most machines should show between 13.5 and 14.5 volts while the engine is running. If the reading is outside this range, your voltage regulator is likely failing.
How does a battery tester help with charging issues?
A battery tester checks if the cells can actually handle the pressure of starting the engine. This is much more reliable than a simple voltage reading.
Why does an ATV battery keep dying after rides?
The stator or regulator might not be pushing enough power back into the battery. It is also possible that the battery is simply too weak to hold a charge anymore.
Secure Your Ride with a Strong ATV Battery
You now have the skills to perform an ATV battery charging test like a professional mechanic. Understanding the relationship between your stator and battery keeps you from being caught off guard. Regular care and fixing power issues will keep your vehicle on the trails for years.
A healthy ATV battery is the foundation of every successful off-road trip. Do not wait for a total failure before you decide to test the ATV battery with a multimeter. Small adjustments today can prevent expensive repairs during the peak of the season.
If your current battery fails the load test, it is time for an ATV battery replacement. Upgrading to a high-quality power solution provides the peace of mind you need for every type of ride. Find the perfect match for your machine today and enjoy a strong start every time.